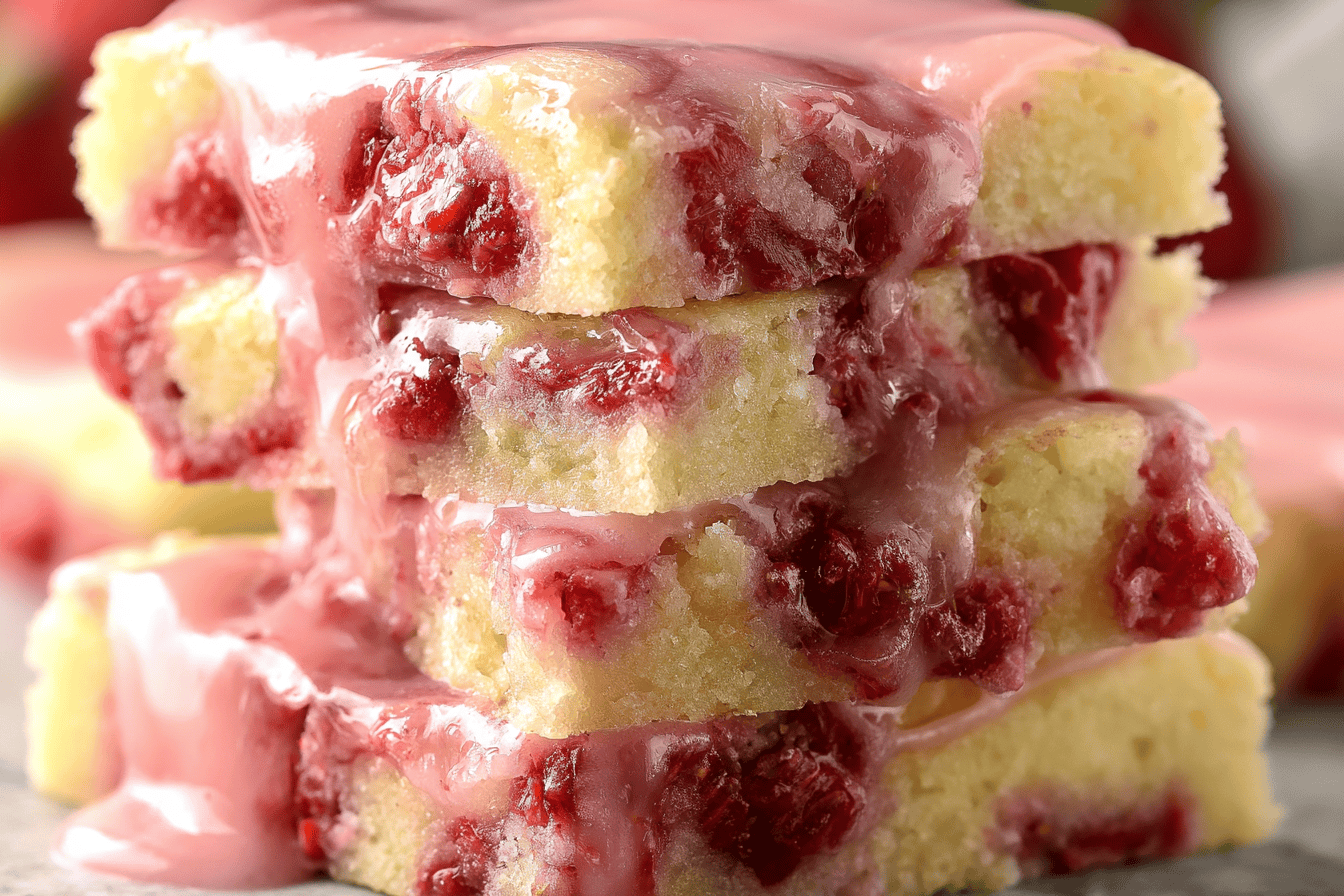
If your favorite summer drink could turn into a dessert, it would taste exactly like these Strawberry Lemonade Dream Bars. Picture a crunchy Nilla wafer crust topped with a smooth no-bake lemon cheesecake layer, scattered with fresh diced strawberries, and crowned with a dreamy strawberry cream. Honestly, every bite delivers that sweet-tart strawberry lemonade flavor you crave when the weather warms up. Best of all, there’s no oven required, so you can stay cool while you make them. They do take a little patience to set, but I promise the creamy, fruity result is worth every minute. Let me walk you through it.
Why You’ll Love These Bars
Let’s start with why this recipe is such a showstopper. Frankly, it hits every note a summer dessert should.
First and foremost, they’re completely no-bake. Since you never turn on the oven, they’re perfect for hot days when baking sounds miserable. Instead, the fridge and freezer do all the setting for you.
On top of that, they capture a nostalgic, crave-worthy flavor. The bright lemon cheesecake and sweet strawberry cream taste just like a glass of strawberry lemonade, which makes them irresistibly refreshing.
They’re also beautifully layered. With a buttery crust, a tangy cheesecake middle, fresh berries, and a fluffy strawberry top, each forkful offers a little of everything. That contrast of textures is what makes them feel so special.
Finally, they’re a fantastic make-ahead party dessert. Because they need to chill overnight anyway, you can prep them well before guests arrive. In short, they’re cool, creamy, and guaranteed to impress.
The Ingredients You’ll Need
This recipe comes together in distinct layers, so the list looks long, but each part is simple. Here’s everything you’ll need, organized by layer for easy shopping.
| Layer | Ingredient | Amount |
|---|---|---|
| Crust | Nilla wafer cookie crumbs (about 90 cookies) | 3 cups |
| Crust | Butter | 10 tablespoons |
| Strawberry Cream | Strawberry Jell-O (two 3.5 oz packages) | 7 oz |
| Strawberry Cream | Boiling water | 1½ cups |
| Strawberry Cream | Cold water | 1½ cups |
| Strawberry Cream | Cream cheese, room temperature | 16 oz |
| Strawberry Cream | Cool Whip | 4 cups |
| Cheesecake | Cream cheese, room temperature | 12 oz |
| Cheesecake | Powdered sugar | 1½ cups |
| Cheesecake | Fresh lemon juice | 3 tablespoons |
| Cheesecake | Fresh lemon zest | 1 tablespoon |
| Cheesecake | Cool Whip | 1½ cups |
| Additional | Strawberries, washed, hulled, and diced | 16 oz |
| Additional | Cool Whip (for serving) | ½ cup (remaining) |
A few important notes before we begin. You’ll use a total of 16 ounces of Cool Whip (two 8-oz tubs), divided across the layers and serving, plus 28 ounces of cream cheese split between the two cream layers, so make sure to have enough of each on hand. Also, let all your cream cheese come fully to room temperature, since that’s the secret to a smooth, lump-free filling.
Recipe Notes to Read First
This dessert has a couple of quirks worth knowing before you start. Most importantly, use only the water amounts listed in this recipe to mix the gelatin, not the amounts on the Jell-O box. We want a firmer, more stable gelatin and less of it, which is key to the right texture. Additionally, don’t let the strawberry cream mixture chill for much longer than the one hour called for, because the gelatin will begin to set and form red specks. That’s not a problem flavor-wise, but if you want a perfectly smooth, speck-free top layer, stick to the timing.
How to Make Strawberry Lemonade Dream Bars
We’ll build this dessert one layer at a time. It’s not difficult, just a process, so I’ll walk you through each stage clearly. To begin, lightly spray a 9×13-inch baking pan with cooking spray.
Step 1: Make the Nilla Wafer Crust
Start by melting the 10 tablespoons of butter in a medium bowl, microwaving for about 30 seconds and stirring, adding another 5 to 10 seconds if needed. Meanwhile, pulse the Nilla wafers in a food processor until you have fine crumbs. Then add the 3 cups of crumbs to the melted butter and mix with a rubber spatula until everything is well incorporated. Next, press the mixture firmly and evenly into your prepared pan to form the crust. Finally, place the pan in the freezer for at least 30 minutes while you prepare the rest.
Step 2: Prepare the Strawberry Gelatin
In a large bowl, stir the strawberry gelatin into 1½ cups of boiling water until fully dissolved. Then add the 1½ cups of cold water and stir again. Place the bowl in the refrigerator until the gelatin is completely cooled but not yet set, about 10 minutes. This cooled-but-liquid stage is exactly what you want for the next step.
Step 3: Start the Strawberry Cream Layer
In a mixing bowl, beat 16 ounces of cream cheese until smooth. Then, using a ladle, slowly drizzle in the chilled gelatin while mixing continuously. Take your time here, as this can take 8 to 10 minutes. The more slowly you add the gelatin, the smoother and more lump-free your mixture will be. Once it’s completely smooth, cover and refrigerate it to chill and thicken for exactly one hour.
Step 4: Make the Lemon Cheesecake Layer
While that chills, beat the remaining 12 ounces of cream cheese with the 1½ cups of powdered sugar, 3 tablespoons of lemon juice, and 1 tablespoon of lemon zest until smooth and creamy. Then gently fold in 1½ cups of Cool Whip with a rubber spatula. Next, drop dollops of this lemon mixture onto your frozen crust and spread it into an even layer with an offset spatula. After that, scatter the diced strawberries evenly over the cheesecake layer.
Step 5: Finish and Assemble
Once the strawberry cream has chilled for its hour, fold in 4 cups of Cool Whip until evenly combined and smooth. Then gently pour this strawberry cream over the strawberries and cheesecake layer, spreading it evenly with an offset spatula. Finally, refrigerate the whole pan for at least 6 hours, though overnight is best. This long chill is what allows the bars to set up firm enough to slice cleanly.
How to Serve and Store
For clean, professional-looking slices, run a large knife under hot water, dry it off, then cut through the bars, repeating between each cut. This little trick keeps the creamy layers from dragging. Serve each bar with a dollop of extra Cool Whip or stabilized whipped cream, a few fresh strawberries, and a sprinkle of lemon zest. As for leftovers, keep the bars tightly covered in an airtight container in the fridge for up to 2 days, and serve them straight from the refrigerator since they’re a chilled dessert.
A Quick Timing Overview
Because this is a make-ahead dessert, here’s the honest breakdown so you can plan around the chill time.
| Stage | Time |
|---|---|
| Prep (hands-on) | 30 minutes |
| Chilling and setting | 6+ hours (overnight best) |
| Total time | About 7 hours |
| Yield | 18 servings |
| Calories | ~456 per serving |
As you can see, your active effort is only about 30 minutes. The rest is hands-off chilling time, which is exactly why this dessert is so convenient to make the day before a party.
My Best Tips for Perfect Dream Bars
After making layered no-bake desserts like this many times, I’ve gathered a few pointers. First, soften your cream cheese fully, because it’s the single biggest factor in smooth, lump-free layers. Second, add the gelatin to the cream cheese slowly, since rushing it leads to lumps. Third, respect the chill times, as both the one-hour cream chill and the overnight set are essential for the right texture. And finally, use that hot-knife trick when slicing for picture-perfect bars.
FAQs
A few questions tend to come up with this recipe, so let me answer them before you start.
Can I use stabilized whipped cream instead of Cool Whip?
Yes, you can swap in homemade stabilized whipped cream if you prefer. Just know that one batch of stabilized whipped cream yields about the same as one 8-ounce tub of Cool Whip, and this recipe needs two tubs’ worth. So you’ll want to make a double batch to have enough for all the layers and serving.
Why shouldn’t I use the water amounts on the Jell-O box?
Great question, and it really matters here. This recipe deliberately uses less water than the box directs, which creates a firmer, more stable gelatin. That extra stability is what helps the strawberry cream layer hold its shape and set properly. If you follow the box amounts instead, your top layer may turn out too loose.
Why does my strawberry cream have red specks?
Those little specks form when the gelatin mixture chills for too long and begins to set before you fold in the Cool Whip. It’s purely cosmetic and doesn’t affect the taste at all. However, if you want a perfectly smooth, speck-free top layer, be sure to fold in the Cool Whip right at the one-hour mark rather than letting it sit longer.
Can I make these in a smaller pan?
You can halve the recipe and use an 8×8 or 9×9-inch pan, which is actually how the original photos were made. Keep in mind the layers will be a bit thicker that way. You may also end up with a little extra strawberry cream, but that’s no loss, since it’s delicious on its own with a dollop of whipped cream.
How far ahead can I make them?
These bars are ideal for making ahead, since they need at least 6 hours to set and are even better overnight. For the best results, prepare them the day before you plan to serve. Once set, they’ll keep tightly covered in the fridge for up to 2 days.

Strawberry Lemonade Dream Bars
Ingredients
- 16 oz Cool Whip two 8 oz tubs, divided
- 16 oz strawberries washed, hulled, and diced small (plus more for serving)
- FOR THE NILLA WAFER CRUST:
- 3 cups Nilla wafer cookie crumbs about 90 cookies
- 10 tablespoons butter
- FOR THE STRAWBERRY CREAM LAYER:
- 7 oz strawberry Jell-O two 3.5 oz packages
- 1½ cups boiling water
- 1½ cups cold water
- 16 oz cream cheese room temperature
- 4 cups Cool Whip
- FOR THE LEMON CHEESECAKE LAYER:
- 12 oz cream cheese room temperature
- 1½ cups powdered sugar
- 3 tablespoons fresh lemon juice
- 1 tablespoon fresh lemon zest plus more for garnish
- 1½ cups Cool Whip
- remaining ½ cup Cool Whip and additional strawberries for serving (optional)
Instructions
- CRUST: Lightly spray a 9×13-inch baking pan with cooking spray. Melt the butter in a microwave-safe bowl, about 30 seconds (add 5–10 seconds if needed). Pulse the Nilla wafers in a food processor into fine crumbs, then mix the crumbs into the melted butter until well incorporated. Press evenly into the pan and freeze at least 30 minutes.
- STRAWBERRY GELATIN: In a large bowl, stir the strawberry gelatin into 1½ cups boiling water until dissolved. Add 1½ cups cold water and stir. Refrigerate until completely cooled but not set, about 10 minutes.
- STRAWBERRY CREAM: Beat 16 oz cream cheese until smooth. Using a ladle, slowly add the chilled gelatin while mixing (8–10 minutes) until completely smooth. Refrigerate to thicken for one hour.
- LEMON CHEESECAKE: Beat 12 oz cream cheese with the powdered sugar, lemon juice, and lemon zest until smooth. Fold in 1½ cups Cool Whip. Dollop onto the frozen crust and spread into an even layer.
- Scatter the diced strawberries evenly over the cheesecake layer.
- ASSEMBLY: After the strawberry cream has chilled one hour, fold in 4 cups Cool Whip until smooth. Gently pour over the strawberries and cheesecake layer and spread evenly.
- Refrigerate at least 6 hours, preferably overnight.
- To slice, run a large knife under hot water, dry it, and cut, repeating with each slice. Serve with extra Cool Whip, fresh strawberries, and lemon zest.
Notes
Red specks: If the strawberry cream chills longer than one hour, the gelatin sets and forms specks (cosmetic only). Fold in Cool Whip at the one-hour mark for a smooth top.
Whipped cream swap: Stabilized whipped cream can replace Cool Whip; one batch equals one 8 oz tub, so make a double batch.
Smaller pan: Halve the recipe for an 8×8 or 9×9-inch pan (layers will be thicker; you may have extra strawberry cream).
Storage: Keep tightly covered in the fridge up to 2 days; serve chilled.