These No-Bake Peanut Butter Oreo Bars are the dessert I pull out whenever I need something impressive without turning on the oven. They stack three irresistible layers into one bar: a crunchy Oreo crust, a rich and creamy peanut butter middle, and a fudgy chocolate topping. Better yet, there’s no baking involved, so they’re perfect for busy holidays or hot days when the last thing you want is a hot kitchen. So whether you’re feeding a party or treating your family, these bars deliver big. They’re rich, sweet, and dangerously easy. Let me show you how I make them.
Table of Contents
Why You’ll Love These No-Bake Peanut Butter Oreo Bars
First, they’re wonderfully easy, since a food processor and a few bowls do most of the work. Next, they keep your oven free, which is a lifesaver during holiday baking marathons. Plus, they use just a handful of ingredients you probably already have at home. And of course, they’re a fun recipe to make with kids, thanks to all the mixing and spreading. Best of all, you can dress them up with sprinkles or a drizzle for any occasion. In short, they’re the ultimate low-effort, high-reward treat.
The Three Layers That Make These Special
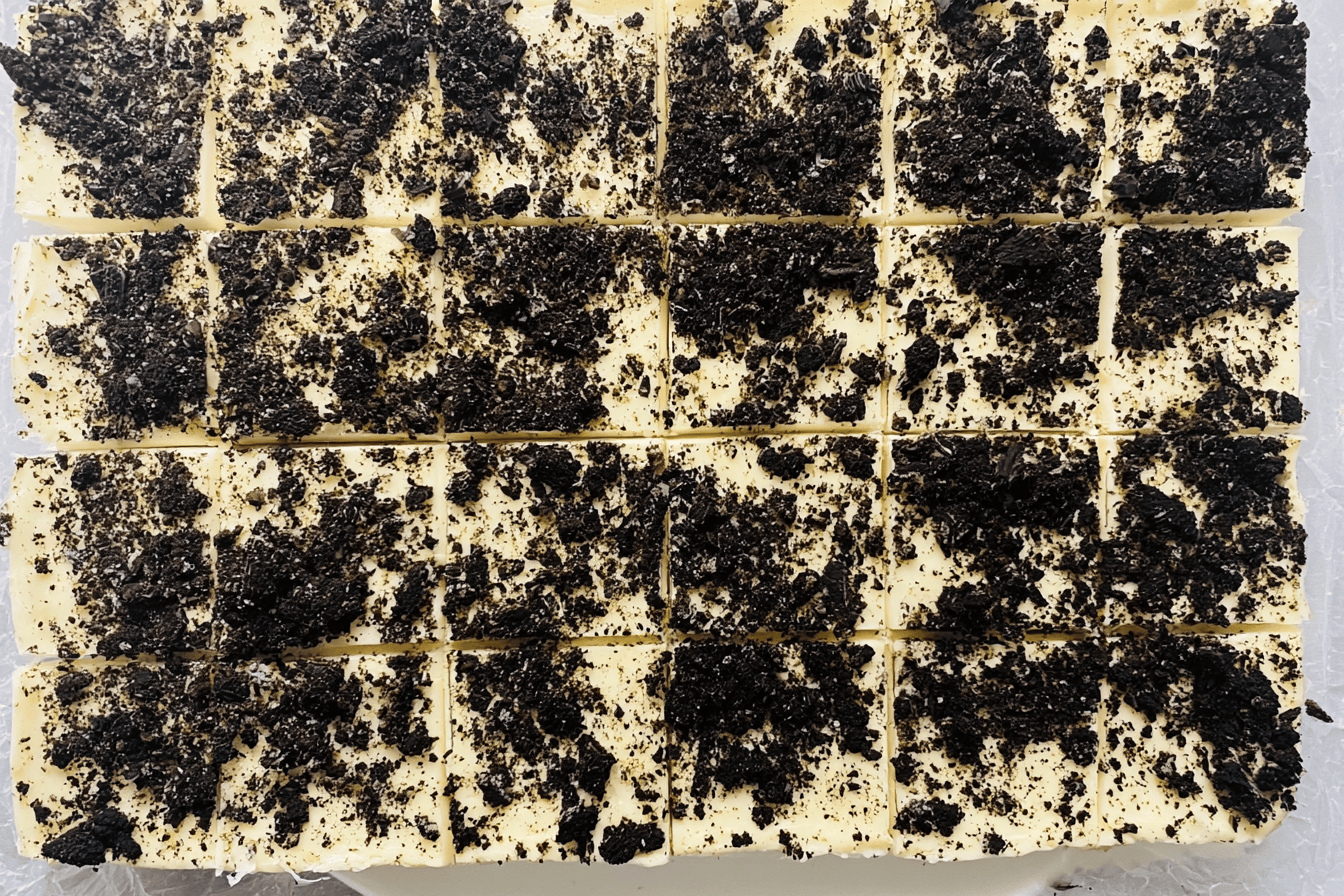
When you slice into these bars, you get three distinct layers, and each one plays a role. At the bottom sits a crunchy Oreo crust that gives every bite structure and that classic cookies-and-cream flavor. In the middle, there’s a smooth, rich peanut butter layer that’s sweet and satisfying. On top, a fudgy chocolate-and-peanut-butter layer seals the deal with a glossy finish. Because the textures contrast so nicely, each bite feels indulgent. So while the recipe is simple, the result tastes like something from a bakery case.
Ingredients You’ll Need
Here’s everything that goes into these bars, measured in US standard amounts. The recipe fills an 8×8 pan and makes 16 servings.
| Layer | Ingredient | Amount |
|---|---|---|
| Oreo Crust | Oreos (Original, not Double Stuf) | 15 cookies |
| Oreo Crust | Butter, softened | 4 Tablespoons |
| Peanut Butter | Smooth peanut butter | 3/4 cup |
| Peanut Butter | Butter | 1/2 cup |
| Peanut Butter | Graham cracker crumbs | 1 1/3 cups |
| Peanut Butter | Powdered sugar | 1 cup |
| Peanut Butter | Vanilla extract | 1 teaspoon |
| Chocolate | Semi-sweet chocolate | 5 oz |
| Chocolate | Peanut butter | 2 Tablespoons |
How to Make No-Bake Peanut Butter Oreo Bars
The process moves layer by layer, and none of it is complicated. Read through once, and then let’s build these bars from the bottom up.
Step 1: Make the Oreo Crust
First, line an 8×8 baking pan with parchment paper and set it aside. Then process the whole Oreos in a food processor until they turn into fine crumbs. Next, add the softened butter and pulse again until the mixture comes together. After that, press the crust firmly and evenly into your prepared pan. Finally, place it in the freezer for 15 to 20 minutes while you move on to the next layer.
Step 2: Mix the Peanut Butter Layer
Meanwhile, add the peanut butter, butter, and graham cracker crumbs to a large bowl and mix until combined. Then stir in the powdered sugar and vanilla, mixing again until smooth. Because the graham crumbs go right into this layer, they give it a lovely body that holds its shape when sliced. After that, press the peanut butter mixture evenly over the chilled Oreo crust, then return the pan to the freezer to firm up.
Step 3: Add the Chocolate Topping
Now, combine the semi-sweet chocolate and peanut butter in a microwave-safe bowl. Then melt them in 30-second increments, stirring between each round until the mixture is smooth. Once it’s fully melted, pour it over the chilled peanut butter layer and gently spread it with a spatula. After that, chill the bars in the fridge for 1 to 2 hours, or until they’re fully set. Then slice and enjoy.
Why Chilling Between Layers Matters
You might be tempted to rush through and skip the freezer steps, but I’d hold off. Here’s why: chilling each layer before adding the next keeps them from blending together into a muddled mess. Because the Oreo crust firms up first, the peanut butter layer sits cleanly on top instead of sinking in. Likewise, a cold peanut butter layer holds steady when you pour the warm chocolate over it. So those short chills are the secret to those crisp, defined layers everyone loves.
My Best Tips for Clean, Beautiful Bars
After making these more than a few times, here are the tricks I rely on:
- Use a parchment sling. Leaving overhang lets you lift the whole slab out for easy slicing.
- Warm your knife. Run it under hot water and wipe it dry between cuts for clean edges.
- Don’t overheat the chocolate. Melting in short bursts keeps it smooth and glossy.
- Slice slightly chilled. Bars that are set but not rock-hard cut without cracking the top.
Fun Ways to Decorate
While these bars are gorgeous as is, you can easily dress them up for any season. For instance, scatter festive sprinkles over the chocolate while it’s still soft. Alternatively, drizzle extra melted peanut butter or white chocolate across the top for a bakery-style look. And if you love texture, a few crushed Oreos or chopped peanuts add a nice finishing crunch. So feel free to make them match whatever holiday or party you’re celebrating.
How to Store and Freeze Them
These bars are as convenient as they are delicious. Because they’re make-ahead friendly, you can prepare them a day or two before your event. Here’s how to keep them at their best.
| Method | How To | How Long |
|---|---|---|
| Refrigerate | Store in an airtight container in the fridge | Up to 5 days |
| Freeze | Store in an airtight container in the freezer | Up to 3 months |
| Thaw | Move to the fridge overnight before serving | Overnight |
One important note: these bars don’t handle heat well, so keep them in the fridge until you’re ready to serve. Otherwise, that creamy peanut butter and chocolate can start to soften and melt.
Key Takeaways
- These No-Bake Peanut Butter Oreo Bars have three layers: Oreo crust, peanut butter, and chocolate.
- They’re completely no-bake and made in a simple 8×8 pan.
- Graham cracker crumbs go into the peanut butter layer to help it hold its shape.
- Chill between each layer, then set in the fridge for 1 to 2 hours before slicing.
- Store up to 5 days in the fridge or 3 months in the freezer, and keep them cold.
Final Thoughts
At the end of the day, these bars prove that a showstopping dessert doesn’t require an oven or fancy skills. With a few pantry staples and a little chill time, you get rich, layered bars that look and taste like a real treat. So the next time you need an easy crowd-pleaser, whip these up and watch them disappear.
Now I’d love to hear from you! Did you make these No-Bake Peanut Butter Oreo Bars, and how did you decorate the top? Leave a comment below, drop a star rating, and share your favorite twist so other readers can try it too.
No-Bake Peanut Butter Oreo Bars
Ingredients
- 15 Oreos Original, not Double Stuf
- 4 Tablespoons butter softened
- ¾ cup smooth peanut butter
- ½ cup butter
- 1 ⅓ cups graham cracker crumbs
- 1 cup powdered sugar
- 1 teaspoon vanilla extract
- 5 oz semi-sweet chocolate
- 2 Tablespoons peanut butter
Instructions
- Line an 8×8 baking pan with parchment paper and set aside.
- In a food processor, process the Oreos until fine crumbs form. Add the softened butter and pulse to combine.
- Press the mixture into the prepared pan and freeze for 15 to 20 minutes.
- In a large bowl, mix the peanut butter, butter, and graham cracker crumbs until combined. Add the powdered sugar and vanilla and mix again until smooth.
- Press the peanut butter mixture evenly over the chilled Oreo crust, then chill in the freezer again.
- In a microwave-safe bowl, melt the semi-sweet chocolate and peanut butter in 30-second increments, stirring between each, until smooth.
- Pour the chocolate over the peanut butter layer and gently spread with a spatula.
- Chill in the fridge for 1 to 2 hours, or until fully set, then slice and serve.