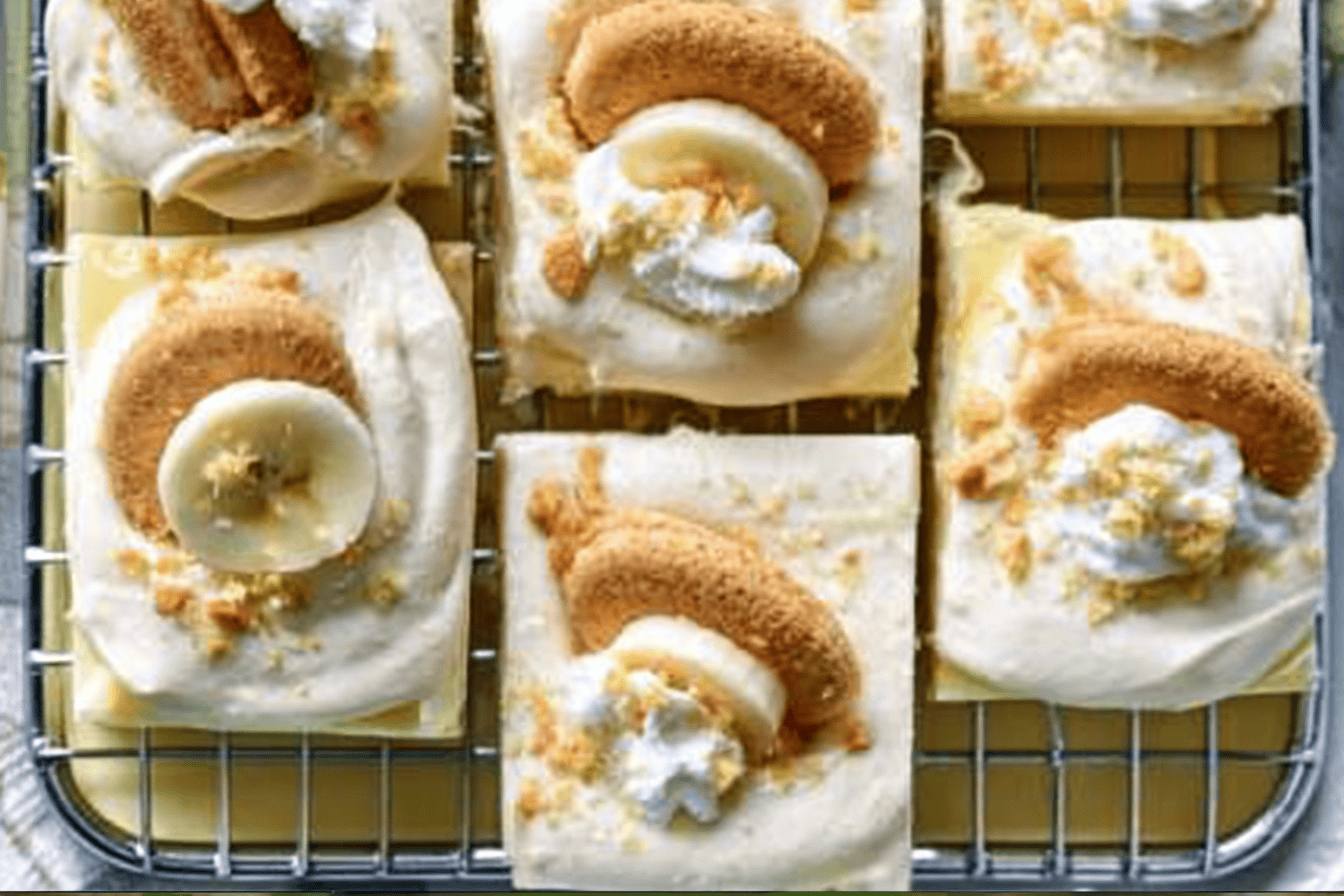
There are desserts that disappear quietly from the table, and then there are desserts like Banana Pudding Bars. The moment you slice into those creamy layers of vanilla pudding, fresh bananas, fluffy whipped topping, and buttery vanilla wafer crust, people start asking for the recipe before they’ve even finished their first bite.
If you love classic Southern banana pudding but want something easier to serve at potlucks, family dinners, picnics, or summer parties, these Banana Pudding Bars are exactly what you’re looking for. They’re rich without feeling heavy, incredibly simple to make, and can be prepared well in advance making them one of my favorite stress-free desserts.
Unlike traditional banana pudding served in bowls, these bars hold their shape beautifully, making serving effortless while keeping every delicious layer intact. The original recipe combines a lightly baked vanilla wafer crust with instant vanilla pudding, fresh banana slices, and whipped topping for a dessert that’s both nostalgic and refreshing.
Why You’ll Love These Banana Pudding Bars<
Every great dessert has that one quality that makes people come back for seconds. With Banana Pudding Bars, it’s the perfect balance of textures.
You get:
- A buttery vanilla wafer crust with just enough crunch.
- Sweet, ripe banana slices.
- Light and creamy vanilla pudding.
- Fluffy whipped topping.
- An easy recipe that requires very little baking.
The crust only spends a few minutes in the oven before the remaining layers come together without any additional baking, making this an excellent dessert for warmer months.
The Story Behind This Classic Dessert
Banana pudding has been a Southern favorite for generations. It’s the dessert many people remember from church gatherings, backyard barbecues, family reunions, and Sunday dinners.
These Banana Pudding Bars take everything people love about traditional banana pudding and transform it into neat, portable squares that are much easier to serve to a crowd.
Instead of scooping pudding into bowls, you simply cut clean squares that already contain every delicious layer.
Honestly, once you’ve served banana pudding this way, it’s hard to go back.
What Makes This Recipe So Good?
The beauty of this recipe isn’t complicated ingredients.
It’s simplicity.
The recipe uses pantry staples you probably already recognize:
- Vanilla wafers
- Butter
- Instant vanilla pudding
- Cold milk
- Whipped topping
- Fresh bananas
Together they create a dessert that tastes like you spent hours making it, even though active prep takes only about 25 minutes before chilling.
Ingredients You’ll Need
Here’s what goes into these irresistible Banana Pudding Bars:
| Ingredient | Purpose |
|---|---|
| Vanilla wafers | Creates the buttery crust |
| Melted butter | Holds the crust together |
| Fresh bananas | Natural sweetness and classic flavor |
| Instant vanilla pudding mix | Creamy filling |
| Cold milk | Thickens the pudding |
| Whipped topping | Adds lightness and fluffy texture |
The recipe is wonderfully beginner-friendly because there are no complicated baking techniques involved.
Choosing the Best Bananas
This small detail makes a huge difference.
Choose bananas that are:
- Bright yellow
- Lightly speckled
- Firm but ripe
- Sweet-smelling
Avoid bananas that are overly green because they lack sweetness.
Likewise, bananas with large black patches may become too soft after chilling.
Perfectly ripe bananas provide the ideal balance of sweetness and texture.
How These Banana Pudding Bars Come Together
The process couldn’t be much easier.
Step 1: Make the Crust
Finely crush the vanilla wafers and combine them with melted butter.
Press the mixture firmly into a 13×9-inch baking dish.
Bake the crust briefly at 325°F for about 8 minutes, then allow it to cool for around 10 minutes before adding the filling.
Step 2: Add the Bananas
Arrange sliced bananas evenly across the cooled crust.
This ensures every square gets plenty of banana flavor.
Step 3: Prepare the Pudding
Whisk together the instant vanilla pudding mix with cold milk until thick.
Fold part of the whipped topping into the pudding mixture to create an extra light and creamy filling.
Step 4: Assemble
Spread the pudding over the banana layer.
Finish with the remaining whipped topping.
Smooth everything into an even layer.
Step 5: Chill
This is the hardest part.
Let the dessert chill for at least 3 hours.
The waiting allows the pudding to fully set while the flavors blend beautifully.
Helpful Tips for Perfect Banana Pudding Bars
A few simple tricks make all the difference.
Use very cold milk
Cold milk helps instant pudding thicken properly.
Press the crust firmly
A compact crust slices much better after chilling.
Cover the bananas completely
Keeping the banana slices covered by pudding slows browning and keeps the dessert looking fresh.
Chill overnight if possible
Although three hours works well, overnight chilling often produces even cleaner slices and deeper flavor.
Fun Variations
One reason this dessert remains so popular is how easy it is to customize.
Try adding:
- Mini vanilla wafer pieces on top
- Crushed graham crackers
- White chocolate curls
- Toasted pecans
- Caramel drizzle
- Chocolate shavings
You can even swap vanilla pudding for banana cream pudding if you prefer a stronger banana flavor.
Serving Ideas
These Banana Pudding Bars fit almost every occasion.
Serve them at:
- Summer cookouts
- Baby showers
- Easter celebrations
- Potlucks
- Birthday parties
- Family reunions
- Holiday dessert tables
They’re served chilled, making them especially refreshing on warm afternoons.
Storage Tips
Because these bars contain fresh bananas and dairy, refrigeration is essential.
Store them covered in the refrigerator for up to 3 days.
For the freshest appearance, garnish with additional banana slices or crushed vanilla wafers just before serving.
Freezing isn’t recommended because the pudding and bananas may lose their texture after thawing.
Final Thoughts
Some recipes become family traditions because they’re complicated.
These Banana Pudding Bars become traditions because they’re incredibly easy.
With just a handful of everyday ingredients, minimal baking, and simple assembly, you get a creamy, nostalgic dessert that always earns compliments. Every layer from the buttery vanilla wafer crust to the fluffy whipped topping works together to create the perfect bite.
Whether you’re preparing dessert for a backyard barbecue, church picnic, or simply satisfying a weeknight sweet tooth, this recipe delivers reliable results every single time. It’s proof that the best desserts don’t have to be difficultthey simply have to be delicious.
Banana Pudding Bars
Ingredients
- 60 vanilla wafer cookies finely crushed
- ⅓ cup unsalted butter melted
- 3 medium ripe bananas sliced
- 2 3.4-ounce packages instant vanilla pudding mix
- 3 cups cold milk
- 2½ cups frozen whipped topping thawed and divided
- Additional crushed vanilla wafers for garnish optional
Instructions
- Preheat the oven to 325°F (163°C).
- Combine the crushed vanilla wafers and melted butter until evenly coated.
- Press the mixture firmly into the bottom of a 9×13-inch baking dish.
- Bake for 8 minutes.
- Remove from the oven and allow the crust to cool for 10 minutes.
- Arrange the sliced bananas evenly over the cooled crust.
- In a large mixing bowl, whisk together the instant vanilla pudding mix and cold milk until smooth and thickened, about 2 minutes.
- Fold 1½ cups of the whipped topping into the pudding mixture until fully combined.
- Spread the pudding mixture evenly over the banana layer.
- Top with the remaining 1 cup whipped topping and smooth the surface.
- Cover and refrigerate for at least 3 hours, or overnight for best results.
- Garnish with additional crushed vanilla wafers just before serving, if desired.
- Slice into bars and serve chilled.
Notes
Chilling overnight creates cleaner slices.
Keep the dessert refrigerated until ready to serve.
Add fresh banana slices or crushed vanilla wafers immediately before serving for the freshest appearance.
Store leftovers covered in the refrigerator for up to 3 days.
Freezing is not recommended, as the texture of the pudding and bananas may change after thawing.